# Integrate a WatchKit App Built in Xcode
# Introduction
This guide covers how to integrate a WatchKit app built in Xcode with your Titanium application as well as information about sharing data between the extension and application. This guide does not cover how to develop a WatchKit app. Currently, the Titanium SDK supports WatchKit apps that are built in Xcode and run on watchOS 2.
A WatchKit app contains a specialized app extension that runs on either the Apple Watch or iOS device, depending on the watchOS version. The WatchKit app allows the user to access data from your application on their Apple Watch.
# Prerequisites
Titanium CLI 5.0 or greater
Titanium SDK 5.0 or greater
Xcode 7 or greater
Xcode Command-Line Tools
Paired iOS devices must run iOS 9.0 or greater
# Create an Apple Watch Application
Using the CLI
To create an Apple Watch application, run the following command from the Titanium project that will include the watch application:
ti create -t applewatch -n <WATCH_APP_NAME> --template watchos2
If you omit the --template option, the CLI will create a watchOS 2 project by default.
The CLI will generate a new Xcode WatchKit project in the Titaniuim project's extensions folder and updates the ios extensions element in the tiapp.xml file. Open the Xcode project's <NAME>.xcodeproj to start developing the watch application.
# Share Data Between the Application and Extension
For watchOS 2 extensions (or later), use the Watch Connectivity Framework (opens new window) and the Titanium.WatchSession APIs to transfer files and data between the watch and iOS application, respectively.
# Setup a Session
To setup a Watch Connectivity session, the watch application needs to check if the paired device supports Watch Connectivity sessions before retrieving a default session and activating it. Activating the session opens a channel between the paired devices.
if ([WCSession isSupported]) {
    watchSession = [WCSession defaultSession];
    watchSession.delegate = self;
    [watchSession activateSession];
}
In the Titanium application, you must also check to see if the paried devices supports Watch Connectivity sessions with the Titanium.WatchSession.isSupported property, then call the Titanium.WatchSession.activateSession() method to activate the session allowing messages to be transferred between devices.
if (Ti.WatchSession.isSupported) {
    Ti.WatchSession.activateSession();
}
To check if the session is activated and the paired watch application is reachable, use the following APIs. Some APIs require that the applications are in a reachable state.
| Watch Connectivity Framework API | Titanium.WatchSession API | Description |
|---|---|---|
+isSupported | Ti.WatchSession.isSupported | Checks to see if the paired device supports Watch Connectivity sessions. |
reachable | Ti.WatchSession.isReachable | Checks to see if the paired devices share a Watch Connectivity session and both applications are in the foreground. |
-sessionReachabilityDidChange: | Ti.WatchSession.reachabilitychanged | Called or fired when the reachability state changes on the paired device. |
# Transfer Data
The Watch Connectivity framework provides a few different ways to exchange data between the iOS device and watch.
Application Context: a shared data object between the paired devices that lasts for the current active session. Use the application context mechanism to synchronization the state between the watch and iOS device.
Watch Connectivity Framework API Titanium.WatchSession API Description applicationContextTi.WatchSession.recentApplicationContext Retrieve the current application context. -updateApplicationContext:error:Ti.WatchSession.updateApplicationContext() Updates the session's application context. -session:didReceiveApplicationContext:Ti.WatchSession.receiveapplicationcontext Called or fired when the session receives an update from the paired device. Messages: pass a data object immediately between the paired devices. Requires that both applications are reachable.
Watch Connectivity Framework API Titanium.WatchSession API Description -sendMessage:replyHandler:errorHandler:Ti.WatchSession.sendMessage() Sends a message to the paired device. -session:didReceiveMessage:Ti.WatchSession.receivemessage Called or fired when the device receives a message from the paired device. ⚠️ Warning
If you are using SDK 5.1.0 or earlier, you should form your request like this:
Ti.WatchSession.sendMessage(message). If you are using SDK 5.1.0 and above, form your request like this:Ti.WatchSession.sendMessage(params).User Info Transfer: pass a data object in the background. Queued and delivered later when the application is reachable again.
Watch Connectivity Framework API Titanium.WatchSession API Description -transferUserInfo:Ti.WatchSession.transferUserInfo() Transfers user info (data object) to the paired device in the background. -session:didReceiveUserInfo:Ti.WatchSession.receiveuserinfo Called or fired when the device receives user info from the paired device. -session:didFinishUserInfoTransfer:error:Ti.WatchSession. finishuserinfotransfer Called of fired when the transfer completes on the paired device.
# Transfer Files
Besides data, you can transfer files between the paired devices. Use the following APIs to transfer files:
| Watch Connectivity Framework API | Titanium.WatchSession API | Description |
|---|---|---|
-transferFile:metadata: | Ti.WatchSession.transferFile() | Transfers a file to the paired device in the background. |
-session:didReceiveFile: | Ti.WatchSession.receivefile | Called or fired when the device receives a file transfer from the paired device. |
-session:didFinishFileTransfer:error: | Ti.WatchSession.finishfiletransfer | Called or fired when the transfer completes (successfully or not) on the paired device. |
# Provisioning Profiles
Before deploying a watchOS application to a device or creating a package for distribution, you need to create provisioning profiles for both the WatchKit application and WatchKit extension. You may either add the watch device to an existing provisioning profile or create separate provisioning profiles. Separate provisioning profiles will be needed if you want to support push notifications.
For directions on creating a provisioning profile, see Deploying to iOS devices or Distributing iOS apps.
After you create your provisioning profiles and add them to Xcode, you need to add the UUID of the provisioning profiles to the tiapp.xml file.
Using a Text Editor:
Open the
tiapp.xmlfile.Locate the
extensionselement under theioselement.Xcode 8 requires the Team-ID of your app to be set in order to link the different app targets. Add the Team-ID of your app into the
team-idelementUnder the
extensionselement, you should see twotargetelements. One is for the WatchKit extension (target name should contain theExtension) and the other is for the WatchKit app (target name should not containExtension.Under each
targetelement, you should see three self-closing elements:devices,dist-appstoreanddist-adhoc. Add the UUID of the provisioning profile as node text for each deployment type.devices: Add the UUID of the development provisioning profiledist-appstore: Add the UUID of the app store distribution provisioning profiledist-adhoc: Add the UUID of the ad hoc distribution provisioning profile
The example below add the development provisioning profiles to the file.
tiapp.xml
<ti:app>
  <ios>
    <!-- Required for Xcode 8 and later (Titanium SDK 5.5.0+) -->
    <team-id>YOUR-TEAM-ID</team-id>
    <extensions>
      <extension projectPath="extensions/foo/foo.xcodeproj">
        <target name="foo WatchApp Extension">
          <provisioning-profiles>
            <devices>12345678-0987-6543-2121-fedcba098765</devices>
            <dist-appstore/>
            <dist-adhoc/>
          </provisioning-profiles>
        </target>
        <target name="foo WatchApp">
          <provisioning-profiles>
            <devices>abcdef-dead-beef-0909-01234567</devices>
            <dist-appstore/>
            <dist-adhoc/>
          </provisioning-profiles>
        </target>
      </extension>
    </extensions>
  <ios>
</ti:app>
# Run the Project
To run the project, just build and launch the project like you would any other Titanium project, but for the WatchKit app, add the --launch-watch-app or --launch-watch-app-only flags to launch the watch application with or without the iOS application, respectively.
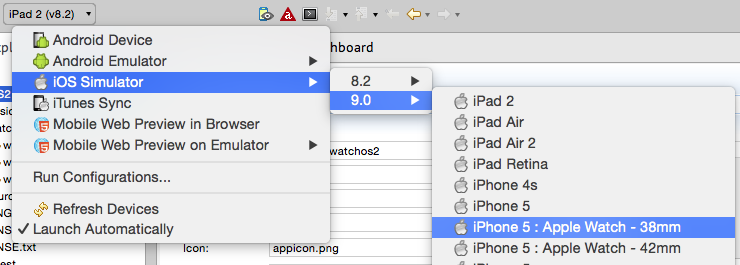
Use the run command from the launch options toolbar. If you want to run the watch application on a simulator, in the Target drop-down, select a 9.0 or greater simulator that has a paired watch target.
For the CLI, execute ti build -p ios with the additional build options.
ti build -p ios --launch-watch-app
If you have more than one watch application extensions, specify the watch application to launch with the --watch-app-name <APP_NAME> option.
If you want to specify the watch simulator, use the --watch-device-id <UDID> option.
# Package the Application
To package the application with the extension, just package the project like you would any other Titanium application. For Studio, use the package command from the launch options toolbar, and for the CLI, execute ti build command with the package options.
# Further Reading
iOS Developer Library: Apple Watch Programming Guide (opens new window)