# Android Intent Filters
# Introduction
Android Intent Filters give applications the ability to receive implicit intents from other Android applications. An intent is a message object, usually containing data, sent by another application to start a new application to handle the data. Intents are sent to the Android OS, which directs the intent to the appropriate application to handle the data. If more than one application can handle the data, Android presents a dialog to the user to select an application to launch. An intent filter indicates to the Android OS that your application can handle certain data types or URIs. For example, if a user opens their browser and highlights some text, the user can share that text with other Android apps, such as an e-mail application, SMS application or a social networking application.
![ShareDialog][ShareDialog.png]
# Receive an implicit intent
To advertise to the Android OS that the application can receive an implicit intent, declare <intent-filter> elements in the tiapp.xml file for each data type you want the application to receive.
# Modify the Android manifest section
Before declaring an intent filter, you need to copy the <activity> node containing your application's default root activity from the build/android/AndroidManifest.xml file to the Android manifest section in the tiapp.xml file.
Build your project once to generate the
AndroidManifest.xmlfile.Open the
build/android/AndroidManifest.xmlfile and and copy the<activity>node that contains your default root activity. Theandroid:nameattribute will contain the name of your application.android/build/AndroidManifest.xml
<manifest xmlns:android="http://schemas.android.com/apk/res/android" package="com.example.sample" android:versionCode="1" android:versionName="1.0">
    <uses-sdk android:minSdkVersion="14" android:targetSdkVersion="19"/>
    <application android:icon="@drawable/appicon" android:label="My App" android:name="MyappApplication" android:debuggable="false" android:theme="@style/Theme.AppCompat">

        <!-- Copy this activity node -->
        <activity android:name=".YourapplicationnameActivity" android:label="@string/app_name" android:theme="@style/Theme.Titanium" android:configChanges="keyboardHidden|orientation|screenSize">
            <intent-filter>
                <action android:name="android.intent.action.MAIN"/>
                <category android:name="android.intent.category.LAUNCHER"/>
            </intent-filter>
        </activity>
        <activity android:name="org.appcelerator.titanium.TiActivity" android:configChanges="keyboardHidden|orientation|screenSize"/>
        <activity android:name="org.appcelerator.titanium.TiTranslucentActivity" android:configChanges="keyboardHidden|orientation|screenSize" android:theme="@style/Theme.AppCompat.Translucent"/>
        <activity android:name="ti.modules.titanium.ui.android.TiPreferencesActivity" android:configChanges="screenSize"/>
    </application>
    <uses-permission android:name="android.permission.INTERNET"/>
    <uses-permission android:name="android.permission.ACCESS_WIFI_STATE"/>
    <uses-permission android:name="android.permission.ACCESS_NETWORK_STATE"/>
    <uses-permission android:name="android.permission.WRITE_EXTERNAL_STORAGE"/>
    <uses-permission android:name="android.permission.ACCESS_COARSE_LOCATION"/>
    <uses-permission android:name="android.permission.ACCESS_FINE_LOCATION"/>
    <uses-permission android:name="android.permission.ACCESS_MOCK_LOCATION"/>
</manifest>
Paste the default root activity into the Android section of your
tiapp.xmlfile inside the<application>element. You may need to add the<manifest>and<application>elements to the<android>element of yourtiapp.xmlfile:tiapp.xml
<ti:app xmlns:ti="http://ti.appcelerator.org">
    <android xmlns:android="http://schemas.android.com/apk/res/android">
        <manifest>
            <application>
                <activity android:name=".YourapplicationnameActivity" android:label="@string/app_name" android:theme="@style/Theme.Titanium" android:configChanges="keyboardHidden|orientation|screenSize">
                    <intent-filter>
                        <action android:name="android.intent.action.MAIN"/>
                        <category android:name="android.intent.category.LAUNCHER"/>
                    </intent-filter>
                </activity>
            </application>
        </manifest>
    </android>
</ti:app>
Note that the <activity> node you just copied over already contains an <intent-filter> element. The elements inside the filter describe to the Android OS that this activity is the initial activity to launch for the application. Do not remove this intent filter or the application will not be available in the application launcher menu.
⚠️ Warning
If you change the name of the application, you will need to copy the newly generated android:name value from the AndroidManifest.xml file and overwrite the old value in the tiapp.xml file.
# Declare intent filters
To declare an intent filter, add <intent-filter> elements as children of the <activity> describing the default root activity of the application. For each <intent-filter>, you must add:
one or more
<action>elements to it to describe which actions the activity can performthe
<category android:name="android.intent.category.DEFAULT"/>element to allow it to receive implicit intents as well as any additional categories you want to add to describe the purpose of the activityand a
<data>element describing which data types the activity can receive
The elements are described in more detail below.
After adding an <intent-filter> tag, add the following children elements to it:
<action/>element: Describes which actions the activity can do. Assign theandroid:nameattribute an action. An action is one of theACTION_*constants from the Android Intent class (opens new window). Remove theACTION_prefix from the constant, then prefix it with theandroid.intent.actionnamespace. Examples:<action android:name="android.intent.action.SEND"/>: Data can be sent to the activity.<action android:name="android.intent.action.VIEW"/>: Data can be viewed by the activity.
<category/>element: Provides additional details about the activity. Assign theandroid:nameattribute a category. A category is one of theCATEGORY_*constants from the Android Intent class (opens new window). Remove theCATEGORY_prefix from the constant, then prefix it with theandroid.intent.categorynamespace. Examples:<category android:name="android.intent.category.BROWSABLE"/>: Indicates that the activity can be invoked from a browser by clicking a link
<data/>element: Describes the data type the activity can handle. You can either describe the data type as a MIME type with theandroid:mimeTypeattribute or as an URI using theandroid:scheme,android:host,android:port,android:path,android:pathPrefixandandroid:pathPatternattributes that take on the form:<scheme>://<host>:<port>/[<path>|<pathPrefix>|<pathPattern>]. Note that all URI attributes are optional except if theschemeattribute is not defined, all other URI attributes are ignored, and if thehostattribute is not defined, all other URI attributes exceptschemeare ignored. Examples:<data android:mimeType="image/*"/>: Activity can accept intents with the image/* MIME type depending on the action.<data android:scheme="http" host="www.fakedomain.com"/>: Activity can accept URIs that start withhttp://www.fakedomain.comdepending on the action.
💡 Hint
For the actions and categories, you can also define your own custom action and category names. Use a reverse domain scheme to name the actions and categories to avoid potential conflicts, for example, com.appcelerator.action.LINT or org.foo.category.SUPER. The custom actions and categories are only useful to communicate between your applications and application activities using intents.
Additionally, you can overwrite the appearance of the option in the Share dialog by using the following <intent-filter> attributes:
android:icon: Icon to display in the Share dialog. Place the icon file in the/platform/android/res/drawable/folder and reference the image file by removing its extension and prefixing it with@drawable/, for example,@drawable/filename. By default, uses the application's icon.android:label: Title displayed in the Share dialog. By default, uses the application name.android:priority: Integer used to determine the priority to give to the application. By default, set to0. Can be assigned a value between-1000and1000, inclusive.
tiapp.xml
<!-- slimmed down some of the nodes for example -->
<ti:app>
    <android>
        <manifest>
            <application>
                <activity android:name=".YourapplicationnameActivity">
                    <!-- default intent filter for launching activity -->
                    <intent-filter>
                        <action android:name="android.intent.action.MAIN"/>
                        <category android:name="android.intent.category.LAUNCHER"/>
                    </intent-filter>
                    <!-- example filter to retrieve or view plain text -->
                    <!-- adds a custom title and icon for the share option -->
                    <intent-filter android:label="Translate To Pig Latin" android:icon="@drawable/pig">
                        <data android:mimeType="text/plain"/>
                        <action android:name="android.intent.action.SEND"/>
                        <action android:name="android.intent.action.VIEW"/>
                        <category android:name="android.intent.category.DEFAULT"/>
                    </intent-filter>
                </activity>
            </application>
        </manifest>
    </android>
</ti:app>
# Retrieve data passed to the activity
To retrieve data sent to an activity using an intent, the application needs to retrieve the intent that launched the activity, then use the Intent reference to get the data URI or extras sent with the intent.
To get the intent of the root activity, use the
Titanium.App.Android.launchIntentproperty.To get the intent of an activity that has an open Window or TabGroup, get a reference to the activity using the
activityproperty of the Window or TabGroup object, then access the intent using the activity'sintentproperty orgetIntent()method.To get the intent of other activities, use the
Titanium.Android.currentActivityproperty to get a reference to the activity, then access the intent using the activity'sintentproperty orgetIntent()method.
// Retrieve intent that launched the application (root activity)
var rootIntent = Ti.App.Android.launchIntent;
// Retrieve intent that launched the window
var uiActivity = win.activity;
var uiIntent = uiActivity.getIntent();
// Retrieve intent that launch the activity
var activity = Ti.Android.currentActivity;
var intent = activity.getIntent();
To retrieve the data URI sent with the intent, simply access the data property of the intent or call the intent's getData() method.
var uri = intent.getData();
To retrieve extras sent with the intent, call the intent's hasExtra() method and pass it the property to retrieve to verify the data exists, then call one of the intent's get*Extra() methods and pass it the same property name to retrieve the data.
The example below checks for EXTRA_TEXT data sent with the intent.
var extra;
if (intent.hasExtra(Ti.Android.EXTRA_TEXT) && (extra = intent.getStringExtra(Ti.Android.EXTRA_TEXT))) {
    // Do something with the extra
}
# Respond to the calling activity
To send a response back to the calling activity, the called activity needs to call its setResult() method, then call the finish() method to close the called activity in order to send the result.
⚠️ Warning
The calling activity needs to call the startActivityForResult() method instead of the startActivity() in order to process the result. See Android Intents: Start an activity with an intent.
Pass a Titanium.Android.RESULT_* constant to the setResult() method to indicate the result of the activity and an optional intent object as the second parameter. Use the intent object to send data back to the calling activity.
The example below returns a string once the activity is created.
someactivity.js
// Get a reference to this activity
var activity = Ti.Android.currentActivity;

// Bind callback to activity's create event
activity.onCreate = function() {

    // Create a blank activity to send data back
    var intent = Ti.Android.createIntent({});
    intent.putExtra(Ti.Android.EXTRA_TEXT, 'foobar');

    // Set the result code and send data back to calling activity
    activity.setResult(Ti.Android.RESULT_OK, intent);

    // Close the activity to return the result
    activity.finish();
}
# MIME Type intent filter example
This example creates an Alloy application that will accept a string from an external application to set the text in a text area widget.
The view code for the application displays a text area and button.
app/views/index.xml
<Alloy>
    <Window>
        <TextArea id='textArea'/>
        <Button id='button' onClick='toPigLatin'>Translate</Button>
    </Window>
</Alloy>
app/styles/index.tss
"Window" : {
  layout: 'vertical'
}
"#textArea" : {
  top: '25dp',
  height: '500dp',
  width: Ti.UI.FILL
}
"#button" : {
  top: '15dp'
}
The controller code retrieves the text string sent to the application if an external application used an intent to start it.
app/controllers/index.js
$.index.open();

if (OS_ANDROID) {
    var launchIntent = Ti.App.Android.launchIntent;
    var extra;
    if (launchIntent.hasExtra(Ti.Android.EXTRA_TEXT) && (extra = launchIntent.getStringExtra(Ti.Android.EXTRA_TEXT))) {
        $.textArea.value = extra;
    }
}

function toPigLatin () {
    // translate $.textArea.value to Pig Latin or some such nonsense
}
Now build the application once to generate the AndroidManifest.xml file.
Next, declare the intent filter in the tiapp.xml file.
Copy the default root activity from the
AndroidManifest.xmlfile to the Android manifest section of thetiapp.xml.Add an
<intent-filter>element as a child of the<activity>element.Add a
<data>element as a child of the<intent-filter>element, then assigntext/plainto theandroid:mimeTypeattribute to tell Android the activity can handle plain text data.Add a
<category>element as a child of the<intent-filter>element. Assignandroid.intent.category.DEFAULTto theandroid:nameattribute to tell Android that the activity wants to receive implicit Intents.Add an
<action>element as a child of the<intent-filter>element, then assignandroid.intent.action.SENDto theandroid:nameattribute to tell Android that the application can receive plain text data.
Note that the activity already had an intent filter declared indicating that the application should be available in the application launcher.
tiapp.xml
<ti:app>
    <android>
        <manifest>
            <activity android:name=".GibberishActivity"
                      android:label="Gibberish" android:theme="@style/Theme.Titanium"
                      android:configChanges="keyboardHidden|orientation">
                <intent-filter>
                    <action android:name="android.intent.action.MAIN"/>
                    <category android:name="android.intent.category.LAUNCHER"/>
                </intent-filter>
                <intent-filter android:label="Translate to Pig Latin">
                    <data android:mimeType="text/plain"/>
                    <category android:name="android.intent.category.DEFAULT"/>
                    <action android:name="android.intent.action.SEND"/>
                </intent-filter>
            </activity>

        </manifest>
    </android>
<ti:app>
You now have an app that is ready to receive Intents. Install it on either an Android device or emulator and make sure it runs. Close the application. Now you can test the Intent Filter by doing the following:
Open your Android browser and go to a website. | You should be greeted with an Intent list that | Select your app in the list and you will then be directed |
|
|
|


# URI intent filter example
This example creates a very simple application that will make itself available to a very specific intent. The application will present itself in the intent list anytime we click on a link that is destined to http://www.titaniumsdk.com (opens new window).
The code for the application simply displays a label to the user that tells them we know they just clicked on a link to www.titaniumsdk.com.
Resources/app.js
Ti.UI.backgroundColor = '#fff';

var win = Ti.UI.createWindow();
var label = Ti.UI.createLabel({
  text:"I'll bet you just clicked on a link to http://www.titaniumsdk.com",
  color:'#000',
  font: {
    fontSize:32
  },
  width:'80%'
});
win.add(label);

win.open();
If you build and run it, your output should look roughly like this:

Next, declare the intent filter in the tiapp.xml.
Copy the default root activity from the
AndroidManifest.xmlfile to the Android manifest section of thetiapp.xml.Add an
<intent-filter>element as a child of the<activity>element.Add a
<data>element as a child of the<intent-filter>element, then assignhttpto theandroid:schemeattribute andwww.titaniumsdk.comto theandroid:hostattribute. This tells Android the activity can handle HTTP requests targeted at the host www.titaniumsdk.com (opens new window).Add a
<category>element as a child of the<intent-filter>element. Assignandroid.intent.category.DEFAULTto theandroid:nameattribute to tell Android that the activity wants to receive implicit Intents.Add another
<category>element. Assignandroid.intent.category.BROWSABLEto theandroid:nameattribute to tell Android that the request can come from the browser.Add an
<action>element as a child of the<intent-filter>element, then assignandroid.intent.action.VIEWto theandroid:nameattribute to states that the activity will be handling VIEW intents.
Note that the activity already had an intent filter declared indicating that the application should be available in the application launcher.
tiapp.xml
<ti:app>
    <android>
        <manifest>
            <activity android:name=".IntentFilterTestActivity"
                      android:label="Intent Filter Test" android:theme="@style/Theme.Titanium"
                      android:configChanges="keyboardHidden|orientation">
                <intent-filter>
                    <action android:name="android.intent.action.MAIN" />
                    <category android:name="android.intent.category.LAUNCHER" />
                </intent-filter>
                <intent-filter>
                    <data android:scheme="http" android:host="www.titaniumsdk.com"/>
                    <category android:name="android.intent.category.DEFAULT" />
                    <category android:name="android.intent.category.BROWSABLE" />
                    <action android:name="android.intent.action.VIEW" />
                </intent-filter>
            </activity>

        </manifest>
    </android>
<ti:app>
You now have an app that is ready to receive Intents. Install it on either an Android device or emulator and make sure it runs. Close the application. Now you can test the Intent Filter by doing the following:
Open your Android browser.
Search for "appcelerator" on google.com.
Click the link for http://www.titaniumsdk.com (opens new window).
You should be greeted with an Intent list that looks something like this:
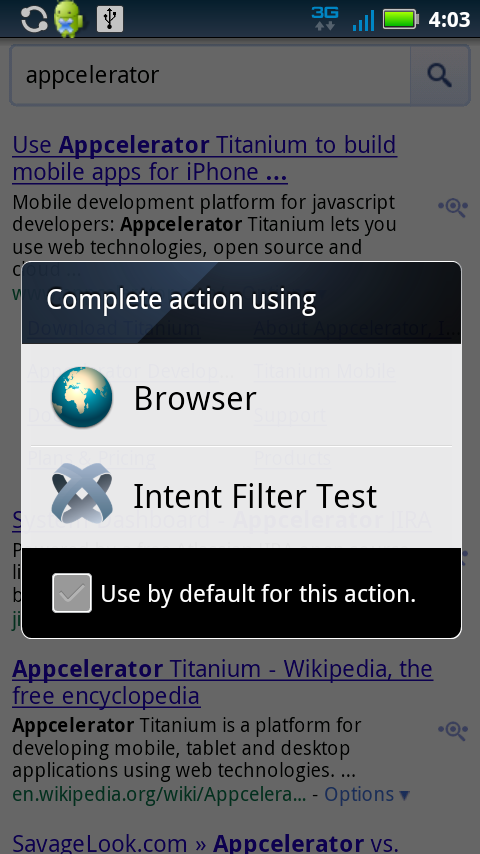
Select your app in the list and you will then be directed to your application containing the "I'll bet you just clicked on a link to www.titaniumsdk.com" label.