macOS Setup
Applies to macOS, iOS, AndroidWritten for Titanium SDK 13.4.0 and later
Install Node.js
Titanium requires Node.js 22.19.0 or 24.x.
Important
Node 26 is only compatible with Titanium SDK 14 or newer. Node 24 works with every SDK.
curl -o- https://raw.githubusercontent.com/nvm-sh/nvm/v0.41.0/install.sh | bashReopen your terminal, then:
nvm install 24brew install node@24Versioned formulas are keg-only. Add $(brew --prefix node@24)/bin to your
PATH.
Download the macOS .pkg from
nodejs.org.
node -vInstall a JDK
Titanium requires JDK 17, 21, or 25. JDK 26 is only compatible with Titanium SDK 14 or newer. Any distribution works. The commands below install Temurin or your distribution's OpenJDK.
brew install --cask temurin@21Download the macOS .pkg from
Adoptium.
javac -versionSet JAVA_HOME
Gradle and the Titanium SDK locate the JDK through JAVA_HOME. Most installers
leave it unset.
echo 'export JAVA_HOME=$(/usr/libexec/java_home -v 21)' >> ~/.zshrc
source ~/.zshrc
$JAVA_HOME/bin/javac -version
echo 'export JAVA_HOME=$(/usr/libexec/java_home -v 21)' >> ~/.bash_profile
source ~/.bash_profile
$JAVA_HOME/bin/javac -versionecho 'set -gx JAVA_HOME (/usr/libexec/java_home -v 21)' >> ~/.config/fish/config.fish
source ~/.config/fish/config.fish
$JAVA_HOME/bin/javac -versionThe value stays unresolved on purpose: /usr/libexec/java_home reports where
the JDK is now, so an update cannot strand the path. Change -v 21 if you
installed 17 or 25.
Install the Titanium CLI
npm install -g titaniumpnpm add -g titaniumPrefix that with sudo if you installed Node with apt or the installer: their
global directory is owned by root.
ti -vThe command is also available as titanium:
titanium -vInstall the Titanium SDK
The CLI is the tool you run; the SDK is what builds your app. You can have several SDKs installed at once.
ti sdk installWith no version, that installs the latest stable release and makes it the default. It is a few hundred megabytes.
ti sdk list
ti sdk list --releases
Install Xcode
Xcode compiles, signs and installs iOS apps. Titanium drives it rather than replacing it.
Install it from the Mac App Store, or from Apple's developer downloads for a specific version. It is around 10 GB.
Open it once after installing: it finishes setting itself up on first launch, and Titanium cannot use it before that. Then install the command line tools:
xcode-select --installWith more than one Xcode installed, point the toolchain at the one you mean:
sudo xcode-select -s /Applications/Xcode.appWhich version
Titanium SDK 13.4 supports Xcode 15.0 through 26.x. A newer one is not blocked: Titanium reports it as too new and builds anyway. If a build breaks in a way that makes no sense, rule that out early.
Simulators
Xcode installs one iOS runtime with itself. For others, open Xcode → Settings → Components.
SDK 13.4 builds with a minimum deployment target of iOS 15.0, so a simulator older than that cannot run what you build.
Set up signing for a device
A simulator build needs nothing. A real iPhone needs a development certificate and a provisioning profile naming the device. Let Xcode create them:
- Xcode → Settings → Accounts, add your Apple ID.
- Select the team, choose Manage Certificates, add an Apple Development certificate.
- Connect the device and let Xcode register it.
Titanium reads certificates from your keychain and profiles from
~/Library/MobileDevice/Provisioning Profiles, so ti build -p ios -T device
picks them up.
A free Apple ID covers your own device. Distributing to anyone else needs a paid Apple Developer account. See Distributing Apps.
Install the Android SDK
Titanium needs four pieces of it:
| Component | Why | Supported by SDK 13.4 |
|---|---|---|
| SDK Platform | Compiles against it | API 23 to 36 |
| Build Tools | Packages the APK | 30.0.2 to 35.x |
| Platform Tools | Provides adb |
33.x |
| Emulator | Runs a virtual device | Any current version |
Android Studio is the straightforward way to get them. The command-line tools are smaller and are what you want on a build server.
Install Android Studio and let the setup wizard run. It installs a platform, build tools and platform tools.
Then open Settings → Languages & Frameworks → Android SDK and check that SDK Tools lists Android SDK Build-Tools, Android SDK Platform-Tools and Android Emulator.
Download the command-line tools from the
Android Studio downloads page
and unzip them to <sdk>/cmdline-tools/latest. The tools expect that exact
layout and fail confusingly without it.
sdkmanager "platforms;android-36" "build-tools;35.0.0" "platform-tools" "emulator"Note
Google has deprecated sdkmanager in favour of android sdk install platforms/android-36 build-tools/35.0.0. Both work. sdkmanager still ships
in the command-line tools and is what most CI scripts call.
Set the Android SDK path
ti setup androidti setup android finds the SDK and writes the path to the CLI's config, so no
environment variable has to be right.
If you would rather set one, Titanium checks ANDROID_SDK_ROOT and
ANDROID_SDK, then looks for adb on your PATH, then scans the usual install
directories.
Important
ANDROID_HOME is not one of them. Most Android documentation tells you to set
it; Titanium's app build does not read it.
Versions newer than Titanium supports
Google ships API levels and build tools faster than the SDK adds support, so a current Android Studio usually produces warnings:
!  Android API Android 17 (android-37) is too new and may or may not work with
   Titanium SDK 13.4.0.
   The maximum supported Android API level by Titanium SDK 13.4.0 is API level 36.
Titanium builds anyway. Leave them until a build fails, then pin a version it knows:
ti config android.buildTools.selectedVersion 35.0.0Android Studio installs the SDK to ~/Library/Android/sdk, which the CLI already
checks.
Set up an Android emulator
Create a virtual device with Android Studio's Device Manager. On Apple silicon,
choose an arm64-v8a system image: an x86 image runs under emulation and is
unusably slow.
A physical device over USB needs no driver on macOS. Turn on USB debugging in Developer options and accept the prompt on the device.
Verify Titanium is Ready
ti info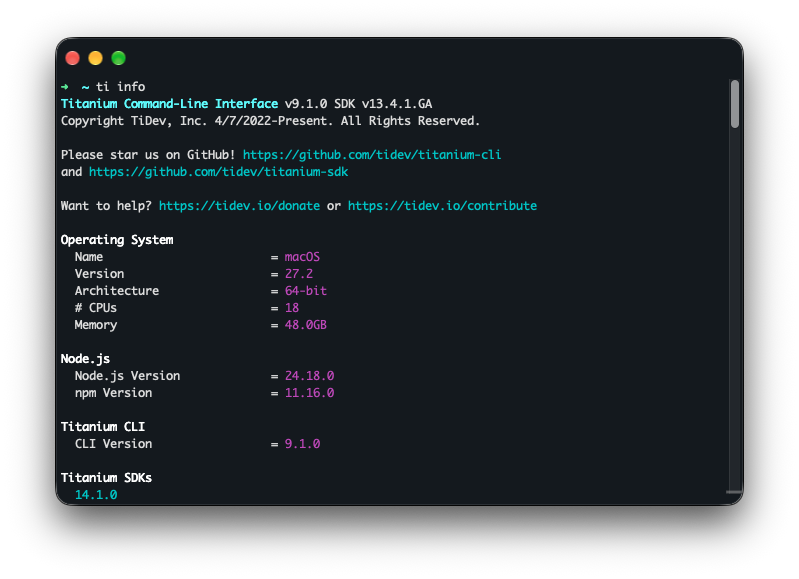
ti info lists everything it detected and any issues it found. A working setup
reports none.
Warnings are common and usually harmless: a component newer than the SDK
supports produces one, and so does a missing NDK. When something is wrong,
ti info names it and says what to do.
Troubleshooting
Every command exits with "Rebuild failed"
You are on Node 26 with SDK 13.4 or earlier. Switch to Node 24, or to SDK 14 - detail here.
ti info reports no iOS certificates
Open Xcode → Settings → Accounts → Manage Certificates and check an Apple Development certificate is listed. Adding it there puts it in the login keychain, which is where Titanium looks.
Build Tools or API level "too new"
Warnings, not errors. Ignore them until a build fails, then pin a supported version with the command in the message.
xcode-select points at the wrong Xcode
xcode-select -pIf that names a beta or a version you removed, set it with
sudo xcode-select -s.
Next
Your first app creates a project and builds it.