Your first app
Written for Titanium SDK 13.4.0 and later
Your toolchain works. This page turns it into a running app: a project on disk, built and launched on a simulator or emulator, changed once so you can see the edit loop, then installed on a real phone.
Budget twenty minutes. Most of it is the first build, which compiles the SDK for your platform and is the slowest one you will run on this project.
If ti info still reports errors, fix those first. A build that fails because
setup is half finished reads like a Titanium bug and is not one. Go back to
environment setup if you need to.
Classic or Alloy
Titanium gives you two ways to write an app. Choosing now saves restructuring later, and the choice is smaller than it looks.
Classic is plain JavaScript against the Titanium API. You build every view
by calling it: Ti.UI.createWindow(), add() its children, open() it. One
file, nothing to install.
Alloy is Titanium's MVC framework. Views are XML, styles are TSS, and controllers are JavaScript. Alloy compiles those into Classic code at build time, so it is a layer over the same API rather than a different runtime.
| Aspect | Classic | Alloy |
|---|---|---|
| Install | Nothing | npm i -g alloy |
| One screen is | A .js file |
An .xml, a .tss, a .js |
| Layout | JavaScript calls | XML elements |
| Styling | Object literals inline | TSS selectors in their own file |
| Data binding | Written by hand | Models and collections |
| Reuse | Functions | Widgets and controllers |
Choose Alloy for an app with more than a few screens. Splitting layout, style and behaviour is what keeps a growing app readable, and the data binding is work you would otherwise write yourself.
Choose Classic for a prototype, a single-screen tool, or when you want to see exactly which API calls produce a screen.
Neither is a dead end. alloy new converts a Classic project in place, so
starting Classic and moving later costs one command.
Pick one now. Every tabbed block on this page follows that choice.
Create the project
ti create --type app --name Hello --id com.example.hello --platforms android,ios --workspace-dir .Install Alloy once, globally:
npm i -g alloyThen create the project and convert it in one step:
ti create --type app --alloy --name Hello --id com.example.hello --platforms android,ios --workspace-dir .--alloy runs alloy new on the project after creating it. Without Alloy on
your PATH the project is still created, as Classic, and the CLI tells you what
to install.
Run ti create with no arguments to be prompted for each value instead. The
flags above are what those prompts write, and every one of them is required:
outside of prompting the CLI has no default for --type or --workspace-dir.
Three of the values matter beyond this tutorial:
--id is the application id, reverse-DNS, and it becomes the Android package
name and the iOS bundle identifier. Changing it later means a new listing in
both stores, so use a domain you control rather than com.example.
--name is the project directory and the name under the icon.
--platforms accepts android, ios and iphone. Use ios for iPhone and
iPad. iphone targets iPhone only, and writes ipad as false in the
deployment targets.
You now have a Hello directory. Project structure
is a tour of what is in it; the short version is that your code is in
Resources for Classic and app for Alloy, and tiapp.xml is the app's
configuration.
Run it
cd HelloBuild for Android:
ti build --platform androidOr for iOS:
ti build --platform iosThat is the whole command. --target defaults to emulator on Android and
simulator on iOS, so with no other arguments Titanium compiles the app, starts
a device image, installs the app and launches it. With more than one emulator or
simulator available you are asked which to use; pass --device-id to skip the
question.
The first build takes several minutes. Later builds reuse most of that work and take seconds.
Not available on iOS
Building for iOS requires macOS. Xcode compiles, signs and installs iOS apps, and Apple ships it only for Mac. Android builds work here as normal.
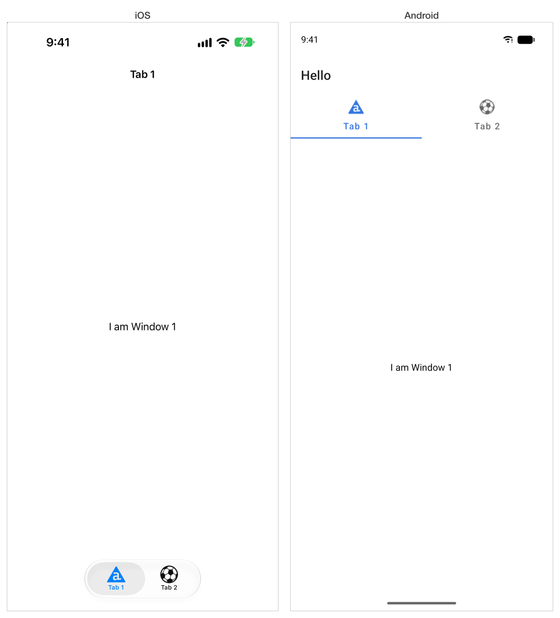
The app opens on two tabs, each with a label. The build log ends with
Project built successfully, and the app's console output continues in your
terminal until you stop it with Ctrl-C.
To compile without installing or launching, add --build-only. It is the fast
way to check that a change compiles.
Change something
Replace the contents of the file the template generated:
const win = Ti.UI.createWindow({
  backgroundColor: 'backgroundColor'
});

const label = Ti.UI.createLabel({
  text: 'Tap the button',
  color: 'textColor',
  top: 80
});

const button = Ti.UI.createButton({
  title: 'Say hello',
  top: 140
});

button.addEventListener('click', () => {
  label.text = 'Hello from Titanium';
});

win.add(label);
win.add(button);
win.open();
Every view here is a function call, and win.open() is what puts it on screen.
backgroundColor and textColor are not CSS names: they are semantic colors
defined in Resources/semantic.colors.json, which resolve to different values
in light and dark mode.
<Alloy>
	<Window>
		<Label id="label" top="80">Tap the button</Label>
		<Button id="button" top="140" onClick="sayHello">Say hello</Button>
	</Window>
</Alloy>"Window": {
backgroundColor: "backgroundColor"
}
"#label": {
color: "textColor"
}function sayHello() {
$.label.text = 'Hello from Titanium';
}
$.index.open();The three files are one screen. An element in the XML becomes the matching
Ti.UI.create* call, id in the view is #id in the TSS and $.id in the
controller, and $.index is the view's top-level element. backgroundColor
and textColor are semantic colors from app/assets/semantic.colors.json,
which resolve differently in light and dark mode.

Build again and tap the button.
ti build --platform androidRebuilding for every edit gets old quickly. Add --liveview and Titanium
reloads the running app when you save instead:
ti build --platform android --liveviewRun it on a real device
A simulator does not tell you how the app feels, and it cannot test the camera, GPS, notifications or real network conditions. Get onto hardware early.
Android
Enable developer mode on the phone: Settings, About phone, then tap Build number seven times. In the Developer options screen that appears, turn on USB debugging. Connect the phone over USB and accept the authorisation prompt it shows.
Check that Titanium sees it:
ti info -t androidThe device is listed under Connected Android Devices with an ID. Then:
ti build --platform android --target deviceWith several devices attached, name one with --device-id and the ID from
ti info.
Android debug builds are signed with a development keystore Titanium generates, so there is nothing to configure. Signing matters when you distribute.
iOS
An iPhone needs a development certificate and a provisioning profile listing that device before anything can install on it. If you set up signing while installing Xcode, that is already done.
Connect the phone, unlock it, and trust the computer when asked. Then:
ti build --platform ios --target deviceTitanium reads certificates from your keychain and profiles from Xcode, picks
the pair that matches your app id, and prompts when more than one fits. Use
--device-id with the UDID from ti info -t ios to choose between devices.
The app stays installed until the profile expires. A free Apple ID gets seven days, a paid developer account a year.
Where to go next
You have the loop: create, build, change, rebuild. The rest of the guides fill it in.
- Project structure explains every directory
the template made and what
tiapp.xmlcontrols. - User interface covers layout, lists and the places where iOS and Android genuinely differ.
- Alloy is the framework in depth: views, styles, models and widgets.
- The API reference documents every type and method, and is complete for every released version.
For a worked example larger than a tutorial, read kitchensink-v2. It exercises most of the SDK in one Alloy app and is maintained alongside it.