# Deploying to Android Devices
# Objective
In this chapter, you will learn how to deploy an Android app to a device for testing.
# Contents
# Configure the Android device
In order to install an application directly to your device, you need to configure it to use a USB connection. The configuration settings vary by device.
For Android 4.2 and later devices, you need to enable Developer options by opening Settings, click About then click the Build number item seven items. If you do not do this, you will not see the Developer options item in Settings.
Open Settings.
Click Security.
Enable Unknown sources, that is, check this option. This permits the device to install apps that do not originate from Google Play.
Back out to Settings.
Click Developer options.
If available: Set the switch in the title bar to on.
Enable USB debugging, that is, check this option. This permits the device to install apps over a USB connection.
Optional: Enable Stay awake, that is, check this option. This option keeps the screen on and disables the lock screen while the device is connected to USB.
Optional: Enable Allow mock locations, that is, check this option. This option creates fake GPS locations to test location services.
Back out of or close Settings.
⚠️ Warning
These configuration settings are the default Android settings. Some options may not appear or you may need to configure other manufacturer-specific settings.
# Install the USB driver (Windows only)
Developers on Windows may need to install a USB driver specific to the manufacturer and model of the device on which they'll be testing. The driver enables your Windows computer to communicate with your Android device. Google provides download links to the drivers at Android Developer: OEM USB Drivers (opens new window).
# Connect the device
Connect the Android device to your computer using an USB cord. Note that some USB cables are only power cables and do not allow communications with the device. Make sure you use a USB cable that allows a data connection.
For 4.2 devices, an "Allow USB debugging?" dialog will appear once connected via USB. Click the OK button.
# Deploying the application using the CLI
To launch the application using the Titanium CLI, run the following command:
ti build -p android -T device --device-id "<DEVICE_ID>"
You may omit the --device-id parameter if you only have one device connected. To retrieve a list of connected devices, run one of the following commands:
ti info -t android
## or
adb devices -l
# Deploy the application using adb
You can use the adb command to install apps to a connected device if you have a built APK file. If the platform-tools directory (within the Android SDK) is in your system's PATH, from a terminal, run the following command:
adb install -r your_project/build/android/bin/app.apk
Hint: use the -e switch to interact with a single running Android emulator; use -d to interact with a single connected device.
You can uninstall an app with adb as well via your app's unique Android package name:
adb uninstall com.your.appid
# Deploy to remote testers
You can deploy your app to remote users for testing. They will need to configure their device as described above. From there, all you need to do is get the APK file to them and their device. A simple solution is to post it on a web site (such as a Dropbox) account. You could also email it to them, as long as they receive the email on their device and not a desktop. In either case, on a device, if you tap on an APK file, Android will prompt you to install that application.
Over the air distribution frameworks were popularized in the iOS space by services such as TestFlight App. With such systems, users install a common client app on their device. That client interacts with a remote server, which is used to distribute beta versions of your app. When you update your app, the client component can detect the change and notify the user to upgrade your app. The open source HockeyKit system (http://hockeykit.net/ (opens new window)) supports distributing both iOS and Android apps to beta testers. It also provides a framework for gathering user feedback and statistics. You can install HockeyKit on your own web server or subscribe to their HockeyApp service and they'll host the server for you.
# Install to the SD card
By default, your application is installed to the device's internal storage. To configure you application to install to the SD card, you need to add the android:installLocation attribute to the manifest element in the tiapp.xml file. Assign the installLocation element to one of the following values:
preferExternal - specifies that you prefer your app to be installed to the SD card, but if one is not present the app can be installed to internal storage.
auto - specifies that the phone's configuration will determine the installation location. Generally, your app will be installed to internal storage if sufficient space is available. In that case, users could still move your app by opening Settings > Applications > Manage applications or Settings > Application manager, tapping your app, and tapping Move to SD card. Note that some manufacturers do not allow applications to be run from the SD card.
internalOnly - which specifies that your app cannot be installed to the SD card. See the Android docs (opens new window) for the various reasons why you might choose this option.
tiapp.xml
<android xmlns:android="http://schemas.android.com/apk/res/android">
   <manifest android:installLocation="preferExternal"/>
</android>
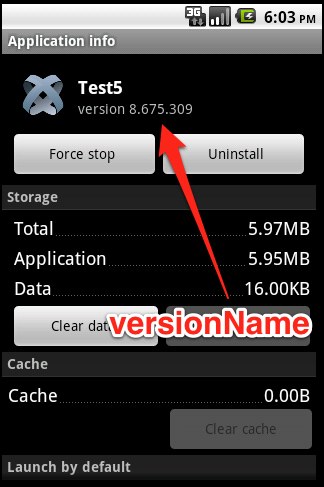
# Change the version number
To change the version of the application, add the following attributes to the manifest element in your tiapp.xml:
android:versionCode - A 32-bit integer (i.e.: a whole number like "2") that must be incremented up whenever a newer version is being submitted to the app store. It cannot be set to a floating point number.
android:versionName - The version name string can be anything you want.
tiapp.xml
<android xmlns:android="http://schemas.android.com/apk/res/android">
    <manifest android:versionCode="2" android:versionName="8.675.309"/>
</android>
For more information on versioning in Android, see http://developer.android.com/guide/publishing/versioning.html (opens new window).
# Troubleshooting
# Restart adb
If your device is not recognized after following the above instructions, the adb process may have hung. Run the following commands in a terminal to restart adb:
adb devices // print list of attached devices
adb kill-server
adb start-server
adb devices // verify that device has been recognized
# USB cord
Some USB cords are only power cables and do not allow a data connection. Make sure that your USB cord allows a data connection.
# Summary
In this chapter, you learned that deploying to an Android device is fairly simple. You configure the device to accept non-market apps. Then, you just need to get the APK file to the testing device. You can do that via adb, an ad-hoc distribution method like a web page, or via a framework like HockeyKit.